Potentially overlooked, but at your own disadvantage because tags are a powerful and easy to learn tool in Gimme VMS. With just a little initial setup work, they can significantly streamline your vending operations and improve your reporting capabilities.
Creating and Using Tags: General Guidelines
Follow these steps to create a new tag:
- Navigate to the Settings page.
- Select 'Tags'.
- Choose the tag type (Products, Product Families, Points of Sale, Customers, Routes).
- Click 'Add category'. Please note that once created, Tag Categories cannot be edited or removed.
- Type in your category and click 'Next' to save.
- Select 'Add Tag' and type in your tag.
- Select 'Next' to save.
Once you've created your tags, you can use them in a variety of ways to manage and report on various aspects of your vending operations. They can be applied to products, product families, points of sale, customers, and routes.
Creating and Using Product Type Tags: A Specific Use Case for Micro Market Inventory
One specific and highly effective use of tags is to create a "Product Type" tag for managing micro market inventory. Here's how you can do it:
- Navigate to the Settings page and click on 'Tags'.
- Click on 'Products' on the left side of the page.
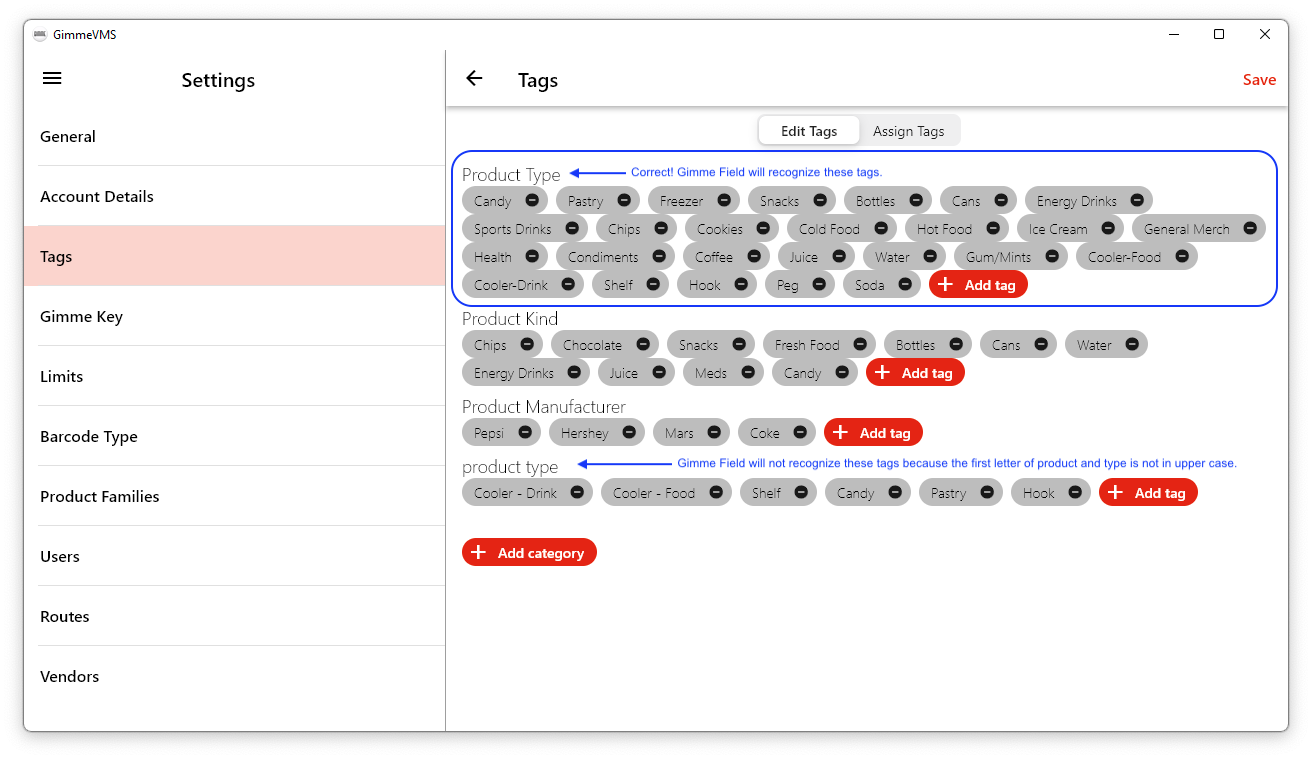
- Create a new category and name it “Product Type”. Capitalize the first letter of “product”and “type” as it is shown in Gimme Field when creating the product type category in VMS.
- Create new tags by adding as many tags as needed under the newly created category. Save your progress before continuing.
- Assign the new tags to the products. Toggle the selector from 'Edit Tags' to 'Assign Tags'.
- Select the tag to be assigned and the products (you may use the search bar to locate products to be assigned a tag).
- Click 'Assign'. Back out before moving to the next tag or deselect the previously tagged products. Pro tip: back out to ensure all previously tagged products are not tagged with a new tag, in case some were not deselected.
- Check your tag assignments on the product page to ensure the product has been assigned a tag.

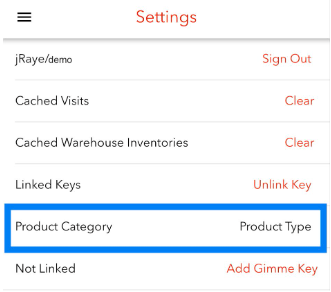
Check out how it looks for a user in Gimme Field in this video!
By assigning product tags, Gimme Field users can filter the planogram view. This can significantly reduce the time it takes to inventory a market.
As Dan McKeever, owner/operator of Snacks Plus Vending, noted, "We reduced the amount of time it takes to inventory a market by 30-60 minutes by assigning product tags for market products!"
Using Tags for Reporting, Sales, Route Performance, and More
Tags can be used in a variety of ways to enhance your vending operations:
- Reporting: Group points of sale or accounts for reporting on sales, placements, etc. This is particularly useful for managing commissions, commission groups, commission payment cycles, and account types.
- Sales or Product Placement: Group products together by kind or some other custom category. This is useful for managing seasonal products that need to be removed from machines due to risk of melting in warmer seasons.
- Route Performance: Categorize routes by division, supervisor, route type, etc. This can help you analyze and improve route performance.
Removing a Tag Category
To remove a tag category, follow these steps:
- Navigate to the Settings page and click on 'Tags'.
- Choose the tag type (Products, Product Families, Points of Sale, Customers, Routes).
- Locate the tag category you wish to remove.
- Within the tag category, remove all tags associated with it by clicking the dash (-) icon next to each tag. This action will delete the tags within the category.
- Once all tags have been removed from the category, ensure that the category is empty.
- Click the "Save" button.
- The tag category should now be successfully removed from VMS.
Conclusion
Tags are a powerful tool in Gimme VMS that can help you manage your vending operations more effectively. By understanding how to create and use tags, you can streamline your processes and improve your reporting capabilities.